So, several people have asked me for the basics on building a GPU based crypto currency miner (more specifically for Ethereum, or ETH). Previously I outlined how to setup up an Ubuntu one for the very, very basics with existing home PC hardware, but they’ve wanted more details for a full fledged setup. Now that I have mine in a happy place, tweaking-wise, I think I’m ready to share my findings. Please do note I am not a complete expert, and you might find better advise elsewhere or additional tweaks I didn’t suggest. I’m not saying this is perfect guidance, but I will stand by it being good. 😀 Additionally, I’m going to make some assumptions to avoid bringing too much into-scope on this write-up, and expect that you already have an Ethereum wallet setup, and have chosen a mining pool to join mining within.
(Oh and to answer the question that comes up a lot: Yes, mining ETH is still practical. ETH was specially designed that custom mining hardware like ASICs will never be a thing like they were with BTC. It’s designed to always live on GPUs. Eventually the difficulty will curve enough that you need tons to do it practically, but right now my 5 GPU rig brings in 3.9 ETH (or $700 after power costs). Investing and buying it might still be better for the average Joe, but if you are a tinkerer and tech guy, this is just plain fun to do!)
First off, if you want to build a solid, full fledged rig, there’s a few things to keep in mind before you set down this path.
It won’t be cheap. You are going to want to max out at 5-6 GPUs and a quality power supply. My rig was $2400 all-in.
It needs to live somewhere. It will produce continuous fan noise, and you want it to sit where that won’t be an issue. (though quality fans, like Frozrs or the stock MSI Gaming X’s are very quiet. Mine are near silent and sit at 30% at load!)
It needs internet. You’ll need a constant connection, though wireless will do just fine.
It’s going to produce heat. My cards are air-cooled and hover around 70c. This causes my open floor-plan condo to kick over the AC every 2 hours or so for 10 minutes to keep it around 74f. By comparison, last year our AC turned on for 20 minutes once a day, this does have a $$ cost for me here in SoCal!
The hardware:
So first off, let’s talk parts. You’re going to need to get all this stuff gathered from a few places on the internet before you get rolling. The majority can be bought at Frys, Amazon, etc, but some of the parts, specifically the case and risers, may require some extra leg work depending on availability.
Motherboard: any board that supports 5-6 GPUs will do. Asrock makes a miner-specific “BTC” series boards for hella-cheap in the 60$ range, but mining-whales grab up the market every time they ship and flip them for $300, so good luck. I just went with an MSI gaming series. Do note that bus speed bandwidth is important with this many video cards, so try to avoid specifically the z170 line of boards due to their bus low bandwidth.
CPU: go cheap here. A Celereon will be *too* cheap, but an i3 is plenty power and cheap. If you go with an older board then you can probably get an older i5 or i7 for cheap as well, up to you. In either case, you are *not* going to be CPU mining, it is a complete money sink to try, just don’t do it okay?
Ram: you want 16gb min, but you don’t need high end gaming shit. Quantity not quality here. (Generally speaking you want 3x the number of GPUs in RAM or 12gb, whichever is larger.. but RAM is cheap so just go all the way now if you can.)
GPUs: you are going to want anywhere from 1 to 6 GPUs, the more the better. AMD is light years ahead of Nvidia in this space due to complex technical reasons I won’t get into. If you have some old 7990’s dust those babies off because they are KING, but impossible to find anymore (we’re talking 75% faster than an RX 4/5xx series!). Other wise you want RX 470/480/570/580s. As of right now, 5xx’s run roughly the same hashrate as 4xx’s. but might be improved over time with new BIOS tweaks. However, they use morepower and produce more heat so if you can get some 470/80’s still at this time (it’s hard), go for it. In either case, the only difference between a 70 and 80 is about 1.5 mh/s hashing power and a 70 will use 45% less power, so aim for a 70. Also an 8GB card will get you 1.5 mh/s more than a 4gb, not because of the memory size but due to the types of chips used being better quality on the 8GB resulting in better hashing. In short, get what you can within your budget from the above, aiming at 7990, 470, 480, 570, 580 in that order.
An SSD: doesn’t matter what size, just big enough for the OS and some other stuff, anything over 126gb will do.
Power supply: this is important! There is where those “gold” and “platinum” ratings actually matter. We’re going to put 60%-80% load 24/7 on this supply so the quality does matter here for longevity. You want a gold or higher, and the power output should be relevant to how many cards you have. For a full on 6-GPU rig you can get by with 1100w but 1300w is better.
Case: Obviously you cant fit 6 GPUs in a tower. Additionally, air flow is hella key. That’s why you work with open framed cases for this, meant specifically for mining. I use this one.
GPU Risers: You are going to need what are called “GPU risers”. Most mining cases come with them, if not.. this is what they look like.
HDMI Emulator: You are going to run a headless windows system, and when you remote in with something like Teamviewer, you will be stuck with a desktop resolution matching that of the monitor attached, or a tiny ass 400×600 pixel view otherwise. Plugging in a little 7$ HDMI emulator dongle will trick the system into thinking a full res display is attached instead!
USB Wi-Fi adapter: Pretty straightforward… your miner will need to phone home to it’s pool every 5-20 seconds, and I doubt you will want wires running to wherever it lives.
HDMI Emulator </div>### The build:
Okay now you have the core hardware, let’s talk setup. You’re going to want to hook everything up in the case you’ve obtained. Those risers? the small breadboard goes into you PCI 1x/16x slots and the usb cable connects it to the long board that slots into your GPUs. Each one needs power over Sata connectors, and I would not suggest more than 3 risers per power rail. The GPUs themselves should each be powered via their own cable and rail… this is where having the high quality PSU helps because it should have rails galore… for example mine has 8 dedicated to GPU’s alone. (*A power rail is basically just an individual cable all to itself*).
Next up, the OS. Now in the word of headless servers, Ubuntu is king.. but guess what? We’re putting Windows 10 on this thing. Yes, I know that sounds insane but bear with me! You are going to eventually want to custom flash the BIOS’s on each card to squeeze out every last Mega-hash per second (mh/s). You’re also going to tweak the settings, overclock the GPU memory, etc. This is all really hard, and in some cases impossible, to do on Linux. Also, the custom Drivers you will need need don’t work so well on there either as while AMD officially supports Ubuntu, their track record is quite spotty.
The nice thing about Windows 10 is that Microsoft really, really, *reaaaaaly* wants the whole world moved onto it. They are all-in on this OS cycle due to some long term world-domination stuff I won’t get into here, and as a result they were willing to make some concessions. One being, you can install it without a key for free and it’s going to pretty much run just fine for you, so long as you don’t mind an obnoxious watermark down in the bottom right popping up. Now, if you plan to do this long term, I think it’s safe to say you can easily afford less than 1/2 of an ETH worth of money on paying for a key, but for the initial tinkering/learning phase, if you are on a tight budget you don’t have to fork that over right away if it’s going to be a blocker.
So get your parts installed, and with only *one* video card connected, boot it on up up and go ahead and install Windows like you normally would, and we’re almost good to go. First up, we need to install some very specific AMD drivers. Now, you can install the latest and it’s going to work fine, but if you want to squeeze every last mh/s out of your cards then you want to tweak your GPU’s BIOS. Unfortunately, last year with driver v. 16.12, AMD added a BIOS check to the drivers. Moving forward from there, if you have a custom BIOS on your card, then windows will not detect the cards properly because “reasons”. To avoid this, we’re going to install OLD drivers from AMD, 16.11 ones to be precise since we need the 16.x drivers to detected 4xx/5xx cards, but not past 16.12. [You can grab those bad boys right here.](https://www.amd.com/en/support/search)
Lastly, there is one other little Windows tweak you need to make: You will want to go into your system profile settings, find the “Virtual Memory” option, and you’re gonna crank that baby all the way up to 16GB. There is a long technical explanation behind this around DAG files, GPU memory etc… suffice to say though, this is a very important step.
Once installed, we want to go ahead and do a test run before we start to screw with the BIOS on them. Both to just rule out variables if something is wrong, and two, to help set a baseline so you know what your improvements did. Go ahead and shut the system down and hook up the other cards now, and then we’ll move on to the software side of things.
Next up you want to get the actual miner software installed. There are a ton of options but one of the best in class is Claymore’s Ethereum miner. [We’re gonna grab the latest one from here.](https://bitcointalk.org/index.php?topic=1433925.0) As of this writing,. 9.4 is the newest, but the main post is updated each time he changes it, this forum thread is the definitive resource for all things Claymore Eth Miner. Download it, and extract the folder to wherever makes sense for you.
We’ll need to make some quick tweaks to the default start.bat file to make it’ll mine for you and not Claymore’s default wallet first though. By now I assume you have an Ethereum wallet address and have chosen a mining pool to be a part of. Getting one, setting up a wallet, choosing/joining a pool, etc, is beyond the scope of this, so I’m going to assume you have one. Open up the start.bat file and edit the existing command-line to read like the following:
`EthDcrMiner64.exe -epool pool.hostname.com:port -ewal YOURETHWALLETID `
for example:
`EthDcrMiner64.exe -epool us1.ethpool.org:3333 -ewal 0xD69af2A796A737A103F12d2f0BCC563a13900E6F `
Now save that bat file, and run it!
> (Worth noting here, Claymore has a \*plethora\* of command line options you can explore and experiment with. Custom tweaks per-gpu.. dual mining for SIA or Decred with unused GPU cycles, fan, power, and heat limiters and optimizations, auto restarts, logging, remote management, you name it! Make sure you dig deep into that Claymore forum thread and learn how to really have fun, once you’re comfortable with the basics!)
You should get some pretty output in a console window that looks similar to this example:
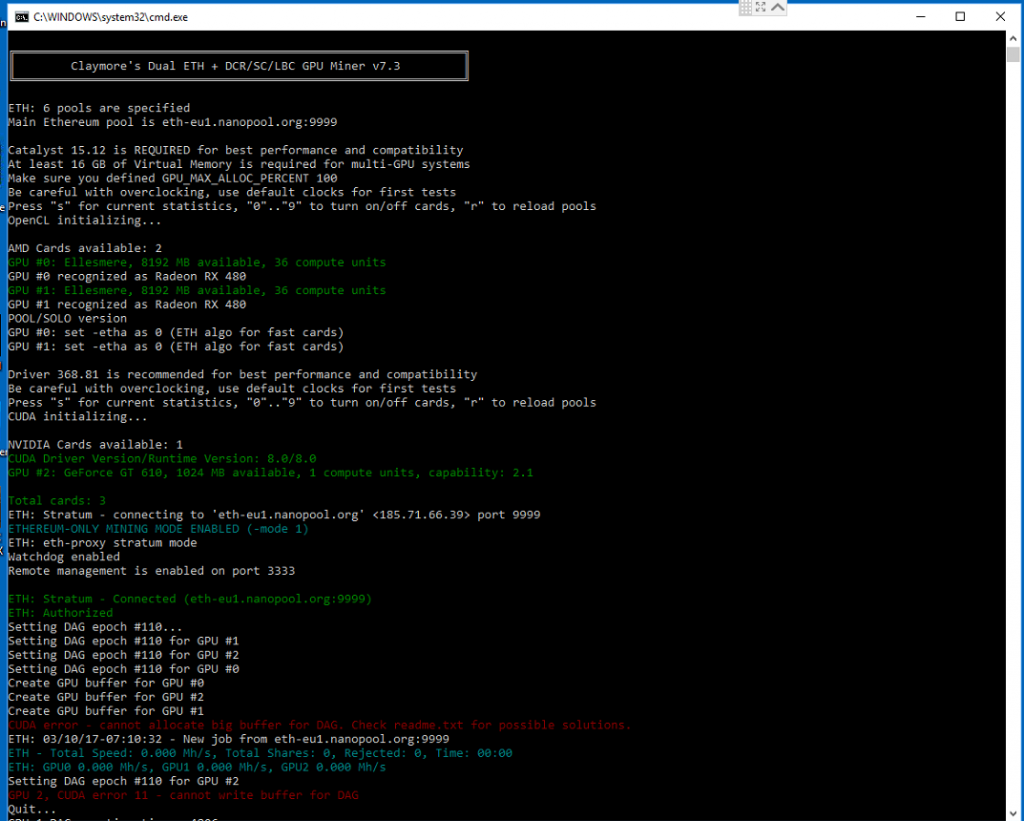
*(This is just a generic example, you’re version, card identifiers, and other data will be different!)*
If it doesn’t look like this, or you have a lot of red, then we’ve got some errors that you’ll need to triage, most of which should be self explanatory thanks to the error reporting, and easy to find answers to in the Claymore thread you got the file from.
Let it run for a bit, and what you’re going to want to look for, is a reporting of stats showing that all of your cards are working as intended. It will be the teal text (for Claymore that is) reading total speed/total shares followed by a second line with each GPU listed in numerical order with it’s individual stats. Pressing the “S” key will force this to appear rather than wait for it’s timer:
Congratulations! You are now mining Ethereum!
### The customization:
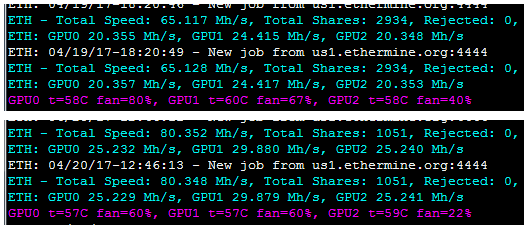
If all of your cards are showing similar numbers then things are looking great! Now, you can call it a day here and let it do it’s thing, and life will be good. If you’re a real min-maxer though, you’re gonna want to do the “fun” stuff and play with the BIOS settings of your GPUs by tweaking the memory timings.
The problem is, this is where it gets hard for me to walk you through things directly, since it all depends on the specific cards you have, and even the types of memory chips among lines of cards. Some cards have custom BIOS files the community has released, ready to go for you. Some have people who have trialed and error many different memory timings and settled on accepted good ones. Others need you to explore on your own, it varies. To be honest, your best bet here is to do a LOT of googling and research before taking any actions… a wrong step here can brick your GPU.
Just to give you a rough idea of what to expect though, I’m going to walk you through exactly what I did for my *own* setup, which has MSI RX 480 Gaming X 4Gb cards, but I cannot stress this enough… **DO NOT DO THE EXACT STEPS BELOW OR USE THE EXACT BIOS FILE BELOW IF YOU DO NOT HAVE THIS *EXACT* CARD!** This is meant to be a learning example to point you in the right direction only. If you flash the wrong BIOS on the wrong card you now own a $300 brick, okay?
In any scenario however, mine or yours, we will want to grab ATI-Flash to copy the BIOS files off the card. I then made a backup of that BIOS in a folder somewhere safe and put an additional working-copy somewhere easy to get to. You can grab the utility here: [ATI-Flash Download](https://www.techpowerup.com/download/ati-atiflash/)
I then used the [Polaris Bios Editor]
[https://github.com/caa82437/PolarisBiosEditor)](https://github.com/caa82437/PolarisBiosEditor) to open the working-copy of that bios file, and made the following changes to the memory timings before saving the BIOS to a new file with an easy to reference name:
1. *Copy the 1500 strap string to the 1625, 1750, and 2000MHz fields.*
2. *Then copy the 1425 strap string to the 1500 MHz, 1375 and 1425MHz fields.*
I then re-opened ATI-Flash and flashed this newly edited BIOS back to the cards, one at a time. Once done, I rebooted the computer and assuming all was well, fired back up Claymore’s miner by launching the start.bat file.
Voila! ~25.5 mh/s per card!
This was by no means fully comprehensive, and I’m not perfect… but this should be enough to get the average person going, and I plan to come back and make edits from time to time as needed!
> Oh by the way.. if this helped you at all and you want to thank me.. you’re welcome to donate any small amount of ETH you would like to the following address! 😉 `0x53705931eC12cAd966B7E9Fdc6FEEc3756B71beb`